
Introduction
I'm a huge fan of iPhone photography. I love the convenience, and the fact that even though I'm not great at it, my photos still turn out pretty good. I've discovered some tricks along the way that have helped me take better photos on my iPhone. The following are some tips I've learned over time that will help you shoot great pics with your phone too:
Get the basics right.
You can get the basics right by setting your phone to shoot in manual mode. This will help you control the ISO (the sensitivity of your camera's sensor), as well as shutter speed, which determines how long a photo is exposed to light. The ideal setting for shutter speed is 1/125th of a second; this allows you to capture clear shots without blurring.
You'll also want to use a tripod or some other surface that isn't moving if possible, as this will help ensure clarity and sharpness in your photos—and calm those nerves too! If you don't have access to such equipment, try propping up one end of your phone on something sturdy while placing it against another object like a table or chair so that it stays steady enough not to fall over.
To focus properly on whatever object(s) you're photographing, tap on the screen where it says "AE/AF Lock" then move around until there are no more red circles around objects or people in any part(s) of the photo (this happens when something isn't focused properly). Once everything looks good through viewfinder mode just hit take picture button! Finally check out shot after taking test picture; adjust settings accordingly if necessary before proceeding onto next step below:

Focus on the subject
-
Focus on the subject.
-
Understand how your camera works and use its limitations to your advantage.
-
Use the rule of thirds when framing a shot.
-
Use manual mode instead of automatic mode, if possible.
Consider the rule of thirds
The rule of thirds is a simple concept that can help you get the most out of your photos. Imagine your photo as divided into thirds, both horizontally and vertically; this means you have nine squares (3 x 3) for placing elements in your photo. These divisions create focal points and help guide the viewer’s eye around the image.
The following images use some of these techniques to create photos that are interesting to look at:
-
The middle section contains the main focus – in this case it’s a tree growing out from under a bridge
-
The top-left corner contains an object that draws attention to itself – in this case it’s a person sitting on the edge of their boat with their arms stretched up high into the air
-
You can also see how several different types of objects come together here: boats, buildings and people working on them make for an interesting composition
Look for patterns and rhythm
Look for patterns and rhythm.
-
Look for symmetry and asymmetry. You can find it in buildings, windows, plants, or even people's bodies. Use the rule of thirds to get the most interesting composition when taking photos of your subject (avoid putting their face directly in the middle of your frame).
-
Look for repetition, rhythm, and movement. This will help you capture movement that might be hard to see with the naked eye while also creating a sense of harmony within an otherwise chaotic scene such as busy streetscapes or cityscapes at night; try different shutter speeds to achieve this effect if needed!
-
Look for the unexpected: If something catches your eye while out on a walk around town after sunset—like this man holding up his phone with blinking lights reflecting off his glasses—then take advantage by snapping some quick shots before he walks away again!
Lock in exposure and focus.
There are two ways you can lock in exposure and focus: by using auto focus or manual focus.
Auto focus is a feature that allows your camera to automatically adjust its settings so that the subject of your photo is in focus. Most point-and-shoot cameras have this feature as well as some DSLR cameras, which stands for digital single lens reflex camera.
Using manual focus allows you to choose what part of the image will be in perfect focus by turning a dial on your camera until it shows an “OK” symbol beside it.
Use Low Depth of Field to create a blur effect
The most straightforward way to create a blur effect is to use a long exposure. This will allow you to capture motion blur and create an image that looks as if it was taken with a high shutter speed. To do this, you'll need to set your camera into Manual (M) mode and adjust the ISO and shutter speed accordingly, so that you have a correct exposure. If you want to freeze action in front of your lens, then use 1/250th or faster (depending on how much light is available).
If you want more control over how blurry or sharp some areas are compared with others, then try using an aperture ring on your lens instead of changing the exposure settings with every shot. An aperture ring will let you select different F-stops which affect depth of field; for example: f/22 for shallow depth of field or f/11 for greater depth of field.
If you're looking for something more dramatic than just blurring out some areas while keeping other parts sharp—like creating silhouettes or selective focus portraits—then consider using manual focus rather than autofocus because it allows photographers greater control over where they want their subject(s) positioned within their composition's frame area (i.e., where does one's eye go first?)
Add a pop of color or minimalism.
You can use color to draw the eye and create a focal point. For example, when using minimalism, you want your subject to stand out from the background. Using white or black will help create a sense of place and also help draw attention to your subject.
Using color in this way can be an effective way to add interest while still allowing other elements like composition and lighting take center stage.

Try off-center composition.
The importance of composition
Composition is one of the most important aspects of photography, because it's what will make or break your photo. It's also one of the most difficult things to master, but it can be done with practice and a little guidance.
There are many different types of compositional techniques that you can use to enhance your photos:
-
The rule of thirds - dividing the frame into thirds both horizontally and vertically creates four sections that are then divided by two lines running through them diagonally. Placing important objects at these intersections helps create balance in your image and attracts attention to them more effectively than if they were placed elsewhere in the frame. This method is often used by professional photographers who want their images to have an artistic feel and look more captivating (like this picture).
-
Diagonal lines - diagonal lines draw our eyes across an image so that we explore it more thoroughly as well as creating excitement through change between near-ground level viewpoints and high altitude vantage points (which also enhances depth perception). When taking pictures like this one, try not just centering everything within view but rather finding ways for various elements within your field-of-view to interact with each other using negative space (space around them) so that all viewers notice something new when looking at each image again later on down the line after having been away from it for awhile themselves."
Create symmetry in your photos.
Symmetry is one of the most important principles of design and is considered a fundamental element in both art and architecture. It creates balance and harmony, which can be used to enhance any photo you take.
-
To create symmetry: Take note of what's around your subject, like buildings or trees. If there are two similar objects, place them on either side of your subject.
-
For example: In this photo I took at an event for my job, I noticed that there were two rows of chairs in the background that matched each other perfectly! They made such a good pair that I decided to put my friend in between them so her face would line up perfectly with both rows.
-
The result: Now her face looks like it's part of the same picture frame as everything else around it!
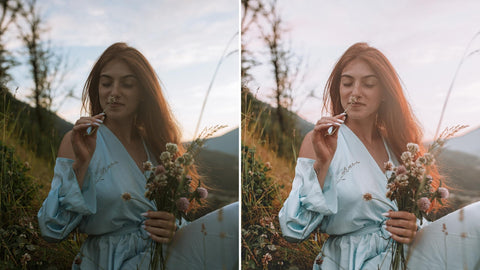
Not only settings matter
You can always achieve professionally looking photos by using Lightroom presets. Sometimes photo with bad lighting can fix presets just in one click. Click here to explore more than 250 Lightroom collections we've to offer!

Conclusion
In this blog post, we’ve covered a lot of tips and tricks for taking better photos with your iPhone. We hope that you can use some of them as inspiration to get out there and start snapping away!


